When you start a new table you become the table's server, with the ability to manage the table:
Setting up your new table (can be a team table)
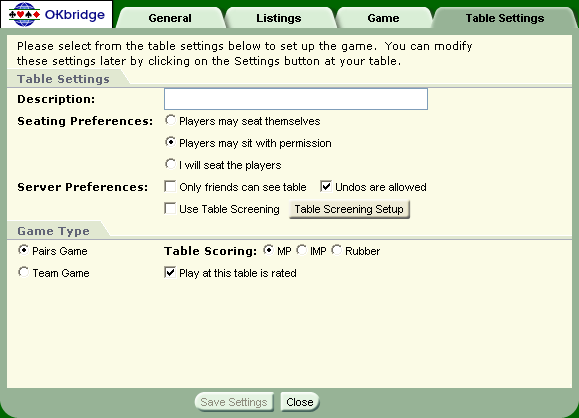
First click the New Table button on the Lobby toolbar. This displays the setup page for your new table. By default, it is configured to start a normal Pairs Game where players must ask permission to take a seat.
Table Settings - first section
Description - type what you want potential players to view.
Server Preferences - make selections for your table preferences:
Players may seat themselves, sit with permission, or be seated by me.
Only my friends can see this table
Undos are allowed
Game Type - second section
Pairs Game – Open a regular bridge table.
Select either MP, IMP, or Rubber.
Choose between rated or Non-Competitive play.
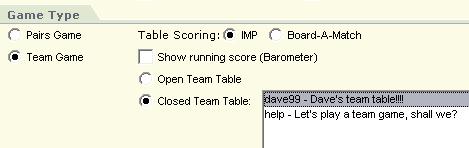
Start a Team Game – Connect two tables together in a special event. In team play, two teams of four play against each other. This involves two tables. The members of a team sit north-south at one table and east-west at the other, and OKbridge deals the same hands to each table.
Select IMP or Board-a-Match scoring.
Choose to show a regular or running score.
Choose to become an "Open Team Table" or a "Closed Team Table." The first team table should select Open, and the second table can be closed. The closed table will need to select the appropriate table from the list of currently open team tables if there are several listed.
Display your new table by clicking the New Table button at the bottom of the setup page after you have completed your entries. This displays your new game table with empty seats.
Your table settings appear in the Information pane for you to view before inviting or seating players. Only the server will see these settings. (After the game is underway, the Information pane changes to display the game details.)
At this point, as the table server you can invite players and seat yourself. Other players can ask you to play or seat themselves.

The table server can invite players by first clicking the Invite button in the game toolbar. This displays the Invite Players page.
Click on your Player settings
Player Level
Player Rating
Player System
Select Players
Available Players shows a list of online players that meet the criteria set in the Player settings. You can click on an available player, then click on an Action button to apply the action to the selected player. Actions include:
View player profile
Invite as partner
Invite as opponent
Chat with player
When the OK button is clicked, the dialog closes and the invited players settings are saved from the dialog. If the Cancel button is clicked, any changes to the invited players settings are not saved. In both cases, you are returned to the playing area.
Choosing permission seating means that every player at your table will need to ask permission before they sit down. Players arriving at your table will see this icon for each empty seat:
As the table server, when a player at your table requests a seat, you will be prompted with a window displaying the player's information and request. Within this window you have two main options:
Accept: Simply press the Accept button to allow the player to sit at their requested seat, or you may choose a different open seat via the Seat Position controls
Decline: If you do not want this player to sit at your table, select the Decline button. You may optionally specify a reason for declining.
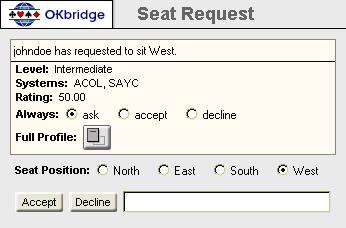
An additional feature within permission seating is the ability to always respond the same way for this particular requesting player. To do so, select the appropriate checkbox beside the "Always" label. You will not receive any more Seat Requst windows for this player if you choose Always accept or Always decline. If you wish to modify this setting for any player, you can do so by pressing the Relationship button in the Player Profile section.
Table Screening allows you to specify certain attributes that will be required for players to be able to take a seat at your table. If Table Screening is enabled, players arriving at your table will not be able to sit unless they match the criteria you choose in the Table Screening Setup.
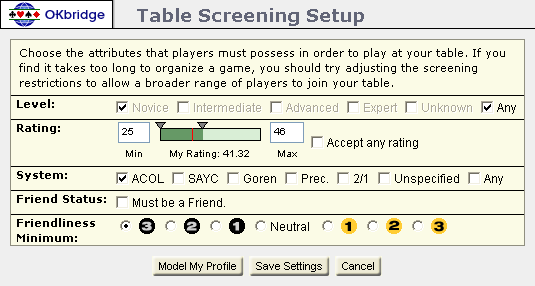
You may restrict the seating at your table by skill level, bidding systems, Lehman Rating, Friendliness Rating, or you can restrict the seating to only those players in your friends list.
The option to [Model My Profile] sets the Table Screening attributes so that the game will be restricted for players who have a skill level, bidding systems, and ratings similar to your own.
If you wish to seat a player who does not match the Table Screening criteria, you may still do so manually using the [Seat] feature, but such players will be blocked from seating themselves.
The table server can seat players by clicking the Seat button in the game toolbar. This displays the Seat Players page where you can view the players currently at the table and seat them in a selected seat.
To seat a player, select the player and click a seat — the player's picture is then shown in that seat. Actions you can perform on a selected seated player include: Unseat, Disconnect, and Lockout.